Friday, December 2, 2011

Christmas is here!

Woohoo! I know its been a few months since I've posted but oh man it's been busy around here!

I really wanted to do an advent calendar for the kiddos this year but December 1st sort of snuck up on me. So I decided to use what I have and create a dry erase countdown.


I had this frame hanging on my gallery wall for football season.


I just cut out a piece of scrapbook paper and put it in the frame. Next I used my Silhouette to cut out some vinyl and adhered it to the front of the glass. Now I can just write my number on the glass. Voila! A dry erase Christmas countdown!

There's Ricky our elf watching our every move! Hope everyone is having a good day!

Thursday, September 15, 2011

Hair Bow Tutorial

A few days ago I had a friend ask me how to make hair bows so I thought that I would post a quick tutorial. I have made lots of hair bows and I have tried lots of different ways to make a hair bow and this method is by far the easiest that I have tried.

Here is what you will need.
Ribbon
Hair Clip
Scissors
Hot Glue
Floral Wire

My ribbon is 1 1/2 inches wide by 25 inches long. In the end my bow ended up being about a 5" bow.
You can use whatever size ribbon you like and depending on the size bow you want you can adjust the length accordingly.
You will also need a smaller piece of ribbon just about 3 inches long you will see why later.


First of all take your ribbon and form into a figure 8 like you see above. Sometimes I like to put just a tiny dab of hot glue between the layers just to keep them together.

Next take your ends and bring them to the center slightly overlapping one another, I also like to put a dab of hot glue here as well just to keep the layers together. Be careful and don't put to much glue here because it will hinder your gathering process.

Now gather the center. It may take you a few times to get the gather to look just like you want it. That's why I glue the layers together, so you don't have to start all the way over if you don't like the gather. Now wrap the center with a small gauge floral wire to hold it together.

Next you are going to take your french clip apart and glue the bottom piece to the back of your hair bow. (Sorry I don't have pictures of this step.) Now take your smaller piece of ribbon and tie a knot in the center of it. Glue the knot to the front of the bow and wrap the ends around to the back. Now glue the ends of the ribbon to the clip. Put your clip back together and there ya have it.

You can see in this picture how I wrapped the smaller pink ribbon around the back.


Here's the front.


Here it is on my little munchkins head!

Have a great day!

Thursday, September 1, 2011

Hairbow Holder

This past weekend we went to a birthday party for the little girl of a dear sweet friend. I always try to come up with gifts that you can't buy at your local Wal-Mart. I decided to throw together a hairbow holder for her literally the night before. It took me 20 minutes and most of that time was spent letting paint dry.

I didn't take any pictures while I was making it but it was really simple. I took a piece of wood and painted the base pink then I used my Sillhouette to create a stencil and simply stenciled on my letter.
Next I just hot glued some ribbon on and there ya have it!


Have a great day!

Monday, August 29, 2011

Doda!

We had a full schedule this past weekend including our "Doda" party. My sweet little M turns 3 this Wednesday and she has been begging for a Dora party. The thrifty mommy in me wanted to make her cake all by myself. So I started researching fondant. After reading several tutorials I found this one to be the best.
My first batch did not go so well but I decided it was because my marshmallows weren't smooth enough so I tried again and got a pretty good result. It's not perfect but M said it was "bweteful" and that's good enough for me!

I made this little t-shirt with my Silhouette, some contact paper, and some craft paint. I forgot to get a good picture of the Dora hair bow I made also. (She didn't want to smile for me.)


Well thats how I've spent the last few days and just for fun I'm going to leave you with a few more pics from the party. Also head on over to Lines Across My Face for her linky party!
http://linesacrossmyface.blogspot.com

Have a great day! ~Candis~

Why is it that kids have to pile up on eachother to open gifts? lol


Sunday, August 21, 2011

Owl Changing Pad


http://linesacrossmyface.blogspot.com

Right now we're living in an apartment so the kids have to share a room. At first, I wanted to do blue, pink, and green and then found this owl fabric that I loved. I decided that Little Sis will be sleeping in our room the first couple of months and hopefully we'll be moved out by then, so I would just do the theme for JJ. However, I still had to have all the important baby gear in there, so it's all done in his theme. :)


I've had visions of the perfect changing pad dancing in my head for months and almost bought one. Then I thought, why would I buy one when I could sew one?! I set out to find a tutorial and found this one from Star over at A Load of Craft. It explains it perfectly, so I'm not going to. I'll just show ya a couple pics of my process and any notes I can think of that might help.

 I decided to make my pad with minky down the middle and my owl fabric on the outsides so I had to do some piecing. I measured the width I wanted the minky which was 11 inches and then cut the owl fabric 11 inches wide, haha. Because of this, I just cut another owl piece 11 inches and then the minky 11 inches and pieced them all together. After it was all sewn, then I trimmed it down to what I needed.


This is the whole piece draped over the changing pad to make sure my minky lined up correctly.

I followed Star's instructions about tracing the pad and making a pattern.


Ok... it's not perfect. :) My fabric bunched around the corners and nothing I did fixed it. It was my first try, and I'm ok with the imperfection. If someone comes over and notices the corners of my changing pad aren't right, they will be invited to re-sew them for me. Haha!


When Star is explaining the corners and she says to pull the corner and get the bulk and then sew a triangle, I noticed alot of people were confused by this. At first, I was too, but once I figured it out, it was really easy. So I wanted to make sure and post this next picture because I think it shows what she means a little more clearly. At least it shows where the triangle is supposed to be sewn better. This is what makes the fabric wrap itself around the bottom corners of the pad.


And this is my finished product!

Hopefully between my tips and Star's wonderful tutorial, you can make your own!

Soon I'll show you more of the room. Like I said, we hope to be moving soon so I don't know how "put together" it will be, but I'm trying. Also, my crazy wonderful husband decided Little Man needed a tractor bed for the room. Nevermind the fact that a tractor doesn't match my owl theme at all... At least I talked him into painting it blue! I'll post that soon.

Thanks!
- Sarah

Linking up here
Keeping It Simplehttp://linesacrossmyface.blogspot.com/
Photobucket


Tuesday, August 16, 2011

Sister Sign

How have you been? School starts back this week so it's been kind of hectic around here. Lately I have been working on my girls room and I whipped this up a few months back.

I had a leftover 1x4 from an earlier project so I spray painted it with my new favorite watermelon color.


Next I used my Silhouette to cut out a stencil and then I just stenciled on. I drilled some holes in the top and hung it by some twine. (Sorry I don't have pictures of the process, my camera messed up)


Now I need to get to work on the curtains, floors and trim. Maybe I will get through some day. Have a good day! ~Candis~

Thursday, August 11, 2011

Fake Roman Shades

Hey, Candis here! Slowly but surely our bathroom has been coming together, all we have left are some cabinet doors but hubby just hasn't found the time for those yet.

A few weeks back I was trying to decide what to do for a window treatment when I came across a girl who had turned her mini blinds into roman shades. So I decided well I can do that! I can't remember exactly which blog I found it on, but I found this one through Google and her tutorial is more detail oriented if you have further questions.

Well the mini blinds in my bathroom were grrooosss, they were in the house when we bought it and had collected dust fooreevver. So first I laid them out on my bathroom floor. Making sure to let them all the way out.

Then I popped the little hole covers off of the bottom, pulled the cord out and snipped the knot off of the end. Next I slipped all but 6 of the slats off. My window is 52" tall and I wanted a little extra so I placed my slats 8" apart. I had this green curtain hanging in there already so I just cut it to fit. Next I hot glued (yes, she said not to use hot glue, but what's the world without hot glue?) my slats down. Be careful when gluing your slats not to glue the lift cord and at the top make sure that you can still slip your blinds back in their brackets.

Here they are! I have to say I'm pretty satisfied with them! Now I have to take the brackets from the old cheap curtain rod down and finish up that bathroom! (P.S. Yes that is a trailer full of sand and bails of hay in my backyard, I live in the middle of podunkville people!)

Hope you have a good day!


Monday, August 8, 2011

For The Love of Baby - A burpcloth DIY

Hi all! Sarah here! I've decided to start a little series of DIY's called For The Love of Baby, since I will be sewing alot of little projects for my baby girl in the next couple of months. She's due to arrive in October, so I better get going on these things!


Today I'm showing yall some burpcloths I whipped up today. I promise these things will take you maybe 30 minutes to make. That is if you aren't making them during naptime and have to keep getting up to deal with a 2 year old crying for Mommy. :)

You will need:
1 piece of fabric 15" x 9"
1 piece of terry cloth 15" x 9
Thread to match.
 (My thread is brown because I'm too lazy to change out the thread there was brown in the fabric.)

Lay the pieces right sides together. Using a 1/2 inch seam allowance, sew all the way around leaving a 4 inch gap in one end for turning right side out. Clip the corners, it makes top stitching a lot easier. Now flip right side out and use a pointy object to get the corners really poked out.


Ok, now just top stitch all the way around. Make sure you fold the seam under where you left the hole to turn it right side out. I use the smallest seam allowance possible here and align the fabric with the presser foot. This stitch is totally up to you. As you can see, my first two cloths had a straight stitch and this one I used a zig zag. I actually think I prefer the straight stitch. Use your creativity!


Enjoy your finished product! I really don't have any burpcloths for The Girl so I just whipped these up from scraps I had. Also, they are always for sell in my Etsy shop - Liberty's Closet Shop. :)


So, go create!
- Sarah

Photobucket

Join  us Saturdays at tatertotsandjello.com for the weekend wrap 
 up           party!

Crayon Wreath

Well I hope you all had a good weekend. We sure did even though it rained on my son's friend's birthday party.
So a few weeks back I saw this adorable idea for a wreath and thought that it would make a great gift idea for my sons preschool teacher. So I took myself down to HobLob and got my supplies.

I found this cute little apple over in the wood cutouts and I just took my Sharpie and wrote the preschool name on it.


Then I found some embroidery hoops and I only used the inside small hoop and the inside large hoop so I still have the outside hoops to use on another project.

 My advice is to paint your hoops before you start your project. I did not do this and I am having to go back with my sharpie and black out all the areas you can see. I only used about 50 crayons so you do not need to buy this box of crayons but I wasn't sure how many I would need and you can never have to many crayons at our house. I had this blue ribbon leftover from making hair bows.

 Sorry I didn't take any pictures of the process, I got into it and kept on going. I glues my ribbon on first and then my apple on top of that. Next I started gluing my crayons, it took me 50 thousand several attempts and a few crayons had to sacrifice their lives for me to figure out the correct spacing but once I got flowing it went pretty fast. All in all I only spent about 7 dollars for the whole thing.


Happy Monday hope you all have a good week!

Saturday, August 6, 2011

Baby Wipes Case DIY

Hi all! Well, my camera is currently off humping through the woods on a USMC camping trip. So I thought I'd post a project I did a while back for Candis's daughter Katelynn. I've seen this tutorial before, but it was pre-Pinterest, so I couldn't tell ya where. If I ever find the fabric I want to use for my new baby girl, I'll show you the one I make for her. :)


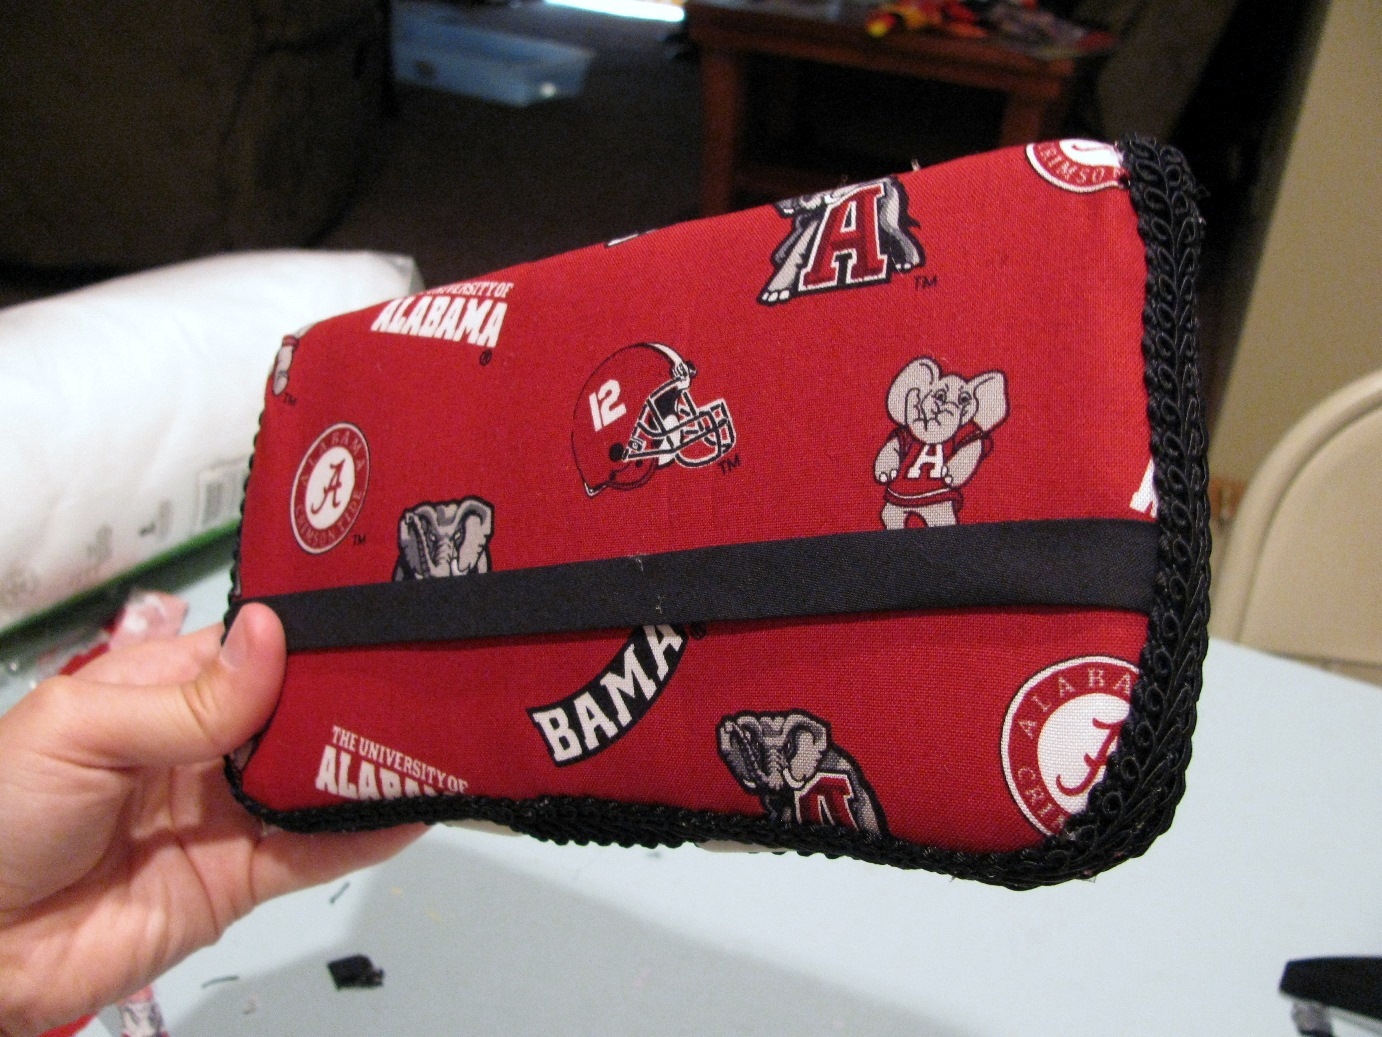
I wanted an Alabama themed wipes case for little Katy Sue and decided I would try to make my own.

What you need:
- 1 empty travel wipes case. (I had a couple different wipes cases and after some trial and error, decided it was easier working with the case that had the narrower lid in the center rather than the one with the wide lid.)
- I used about 1/4 a fabric, so I'm thinking you'd have no problem using a fat quarter.
- Cotton batting - The same size as your fabric.
-1 yd. decorative trim
- Your favorite hot glue gun

First lay the batting out and lay the open wipes case on top of it and trace just a rough square all the way around. Then hot glue the batting to the wipes case. I just glued it down on the edges of the case, stretching from the top to the bottom, then trimmed the excess.


Then lay the open case on top of your fabric, the same way you did the batting. Trace around the case, leaving about an inch of excess fabric for the sides and in case you make a mistake somewhere. Cut it out. (Sorry I didn't take pictures of the tracing steps, I will next time.) Start at one edge of your case and glue the fabric down, getting as close to the edge as you can. Don't worry if it's not perfect, you're going to add trim. :) Then just stretch it around gluing all the way, from top to bottom. Make sure you don't have any glue on the edges that won't allow for you to close the case.


When it's all glued down, trim the edges.


If ya want, now is the time to add any decoration across the front. I just glued a piece of ribbon across, the next one I make will have a rosette added to that.

Ok, you're almost there. It seems like alot of steps, but it's really not. Take your trim and starting at one corner, glue all the way around the edges of the case. Go from the top, around, folding down at the other corner and back across the bottom, back to the original corner you started. That sounded complicated, but once you do it, you'll see what I mean.


Ok, now look at your beautiful finished product! I thought mine turned out pretty good for a first try, and for 30 bucks a pop on Etsy, why not make your own?!


I should be back Monday with my potholders I just whipped up for my kitchen. Come back then!

-Sarah

http://linesacrossmyface.blogspot.com/search/label/the%20Cure%20for%20the%20Common%20Monday